Sürüm Yönetimi
Çevik bir yerelleştirme işlemi sürdürün ve eklenen metinler veya yeni ürün özellikleri için çeviri gecikmelerini önleyin. Proje dallarınızı Crowdin ile bütünleştirin ve çevirmenlerin tüm yeni metinlere hemen erişmesini sağlayın.
Ürün geliştirme üzerinde birkaç kişi çalıştığında, dallar farklı içerik sürümlerinin yönetilmesine yardımcı olur. Eğer devam eden bir projeniz varsa, Crowdin’e proje dalları ekleyebilir ve dağıtım gecikmelerini önlemek için çevirmenlerin metinleri geliştirmeye paralel olarak çevirmelerini sağlayabilirsiniz.
Crowdin’deki dallar, belirli bir simgeyle işaretlenmiş normal klasörlere benzer ve kopya dizgiler için özel davranışlara sahiptir.
Sürüm denetim sistemi (VCS) ve Crowdin’deki dal yapısı örneği:
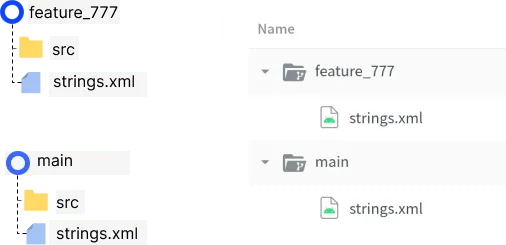
Geliştirmenin yanı sıra yerelleştirmeyi kolaylaştırmak için Crowdin’de dallar oluşturabilir, çoğaltabilir, birleştirebilir, yeniden adlandırabilir, önceliklendirebilir, korumaya alabilir veya silebilirsiniz. Use the available UI options, API, or CLI depending on your workflow and project type.
You can create branches manually using the web interface (UI), automatically by connecting your project to a version control system, or by using CLI or API. The method you choose may depend on your project type or integration preferences.
Crowdin projelerini GitLab, GitHub, Bitbucket veya Azure Repos ile bütünleştirin. When you select branches for localization in your VCS, they’ll be created automatically in Crowdin.
To create branches via the web interface (UI), follow these steps:
- Open your project and go to Sources > Files.
- Click New Version Branch.
- In the appeared dialog, enter the branch name.
- In the Duplicate Strings section, select how duplicated strings should be handled.
- Click Create to finish.
- Open your project and go to the Branches tab.
- Click New Version Branch.
- In the appeared dialog, enter the branch name.
- Select Create empty branch or Clone existing branch.
- If cloning, select the source branch from the dropdown that appears.
- Click Create to finish.
Programlı olarak dallar oluşturmak için Crowdin API’yi kullanabilirsiniz. The available method depends on the project type:
With the Crowdin CLI, you can manage branches directly from your local environment, using the dedicated commands. You can also create a branch automatically during file upload.
Read more about Branch Management with CLI.
For string-based projects, you can make specific branches protected (e.g., your main or production branch) to ensure content stability. When the Enable Protection option is active for a branch, direct modifications to its content are restricted.
The following actions are not allowed in a protected branch:
- Uploading new source content.
- Deleting existing source content.
- Adding translations or approvals directly to strings in that branch.
The primary workflow for protected branches involves performing all content updates and translations in a separate branch (e.g., a cloned dev branch) and then merging those changes into the protected branch.
Crowdin, korunan bir dalı görüntülerken görsel göstergeler sağlar:
- Upload Tab: If you select a protected branch as the target, a blue note appears: “The uploading of files to protected branches is not allowed.”
- Strings Tab: A yellow note appears: “You have currently selected a protected branch. No operations with strings are allowed.”
- Editor: If you attempt to edit a string, the input fields will be disabled. Hovering over the translation field displays the tooltip: “Not allowed for strings from protected branch.”
To update a protected branch, follow these steps:
- Clone the protected branch (e.g., create
devfrommain). - Perform necessary actions in the cloned branch (upload source files, add translations, approve strings).
- Merge the cloned branch back into the protected branch.
You can create a copy of an existing branch using the New Version Branch dialog or the Clone option in the context menu.
To clone a branch, follow these steps:
- Open your project and go to the Branches tab.
- Do one of the following:
- Click New Version Branch.
- Gerekli dalın üzerine gelin, simgesine tıklayın (veya sağ tıklayın) ve Çoğalt’ı seçin.
- In the appeared dialog, enter the name for the new branch.
- If cloning via New Version Branch, select Clone existing branch and choose the source branch from the dropdown.
- Click Create to finish.
You can merge one branch into another directly from the Branches tab using the context menu. Birleştirme işlemi sırasında Crowdin, değişikliklerin bir özetini (örn. kaynak metin güncellemeleri ve yeni çeviriler) görüntüleyerek birleştirmeyi tamamlamadan önce tam olarak hangi değişiklikleri kabul edeceğinizi seçmenizi sağlar.
- In the Branches tab, hover over the source branch you want to merge.
- simgesine tıklayın (veya sağ tıklayın) ve Birleştir’i seçin.
- In the appeared dialog, choose the target branch to merge into.
- Click Continue to proceed to the Merge summary page.
The Merge summary page displays a two-column comparison of all differences between the target branch (e.g., main) and the source branch (e.g., dev).
At the top, you’ll see a summary: You requested to merge {source_branch} into {target_branch}. Select the changes you accept before merging:. The branch titles in this message are clickable links that open all strings for that specific branch in the Editor.
In the upper-right corner, next to the filter, you’ll also see a high-level summary of the changes, with counters for:
- Deleted strings
- Added strings
- Changed strings
- Conflicted strings
Reviewing Translation Changes
If a string has no changes to the source text but includes new translations, it will appear in the list. You can expand the string details using the arrow icon to view the specific translation changes:
- New Translations: Highlighted in green with a sign.
- Deleted Translations: If a translation was removed in the source branch, it will appear highlighted in red.
- Approvals: If a translation is approved in the source branch, it will display a Approved label.
- Metadata: You can see the vote rating and the Date added for the translation.
Key features of this page:
- Selective Merging: You must manually select each change (added, changed, or removed string) that you want to apply to the target branch. A counter (e.g., 1 of 4 selected) in the upper-left corner tracks your selections.
- No Implicit Merges: Only the strings you manually select on the Merge summary page will be merged. If you do not select a string, no changes (neither source nor translation) will be applied to the target branch.
- String Details: Each string in the list displays its context, maximum length (if set), and a timestamp shows when that string was last modified.
- Open in Editor: Hover over a string to see the Open in Editor link, which opens that string in a new tab.
To filter the list to review specific types of changes, click in the upper-right corner and select the preferred filter option.
Kullanılabilir süzgeç seçenekleri:
- All changes: Shows all differences (source and translation) between the branches.
- Added strings: Shows only strings that exist in the source branch but not the target.
- Deleted strings: Shows only strings that exist in the target branch but were removed in the source.
- Changed strings: Shows strings that were modified in the source branch (including translation updates).
- Conflicted strings: Shows strings where the content differs between branches in a way that requires attention. This includes strings modified in both branches, or strings that are newer in the target branch than in the source branch.
Once you have selected all the changes you want to apply, you can finalize the merge.
At the bottom of the page, you’ll find:
- Delete {source_branch} after merge (Optional): Select this to automatically delete the source branch (e.g.,
dev) after its changes are successfully merged. This is useful for cleaning up temporary feature branches. Leave it unselected if you plan to continue working on the source branch. - Merge: Click this to apply all selected changes to the target branch. This button remains disabled until you select at least one change (an added, changed, or deleted string, or changes to translations) from the list.
Once the merge is complete, translations, approvals, and votes from both branches will be combined for the strings you selected.
You can set priorities to branches in file-based projects to help translators focus on the most important content first. Branches appear sorted by priority on the language page and in the Editor.
Available priorities:
- – düşük
- – normal
- – yüksek
Dallarınız için önceliği ayarlamak amacıyla şu adımları izleyin:
- Open your project and go to Sources > Files.
- Click the arrow icon next to the needed branch to set the preferred priority.
In addition to cloning and merging, the context menu for each branch includes the following options:
- Rename – Allows you to change the name of the selected branch.
- Görev Ekle – Önceden seçilmiş dal ile görev oluşturma ileti öğesini açar.
- Cost Estimate – Opens the cost estimation dialog scoped to the branch.
- Delete – Permanently deletes the branch from the project. Use with caution.
Dallar aynı ürün özelliğinin farklı sürümleri olduğundan, bunların yerelleştirme içeriği genellikle çoğaltılmıştır. Çevirmenlerin sürümleri tutarlı bir şekilde çevirmelerine ve ek çeviri maliyetlerinden kaçınmalarına yardımcı olmak için Crowdin, dallar arasındaki kopya dizgileri gizleyen Bir sürüm dalı içinde göster seçeneğini sunar.
When this option is applied, only the master strings (usually from the master branch) need to be translated. Duplicates in other branches inherit translations from those master strings.
In file-based projects, you can configure how duplicates are handled in Settings > Import > Source Strings. If your source files contain clear identifiers (keys), it’s recommended to use the Strict version of the Show within a version branch option. Otherwise, the Regular option will work well for most use cases.
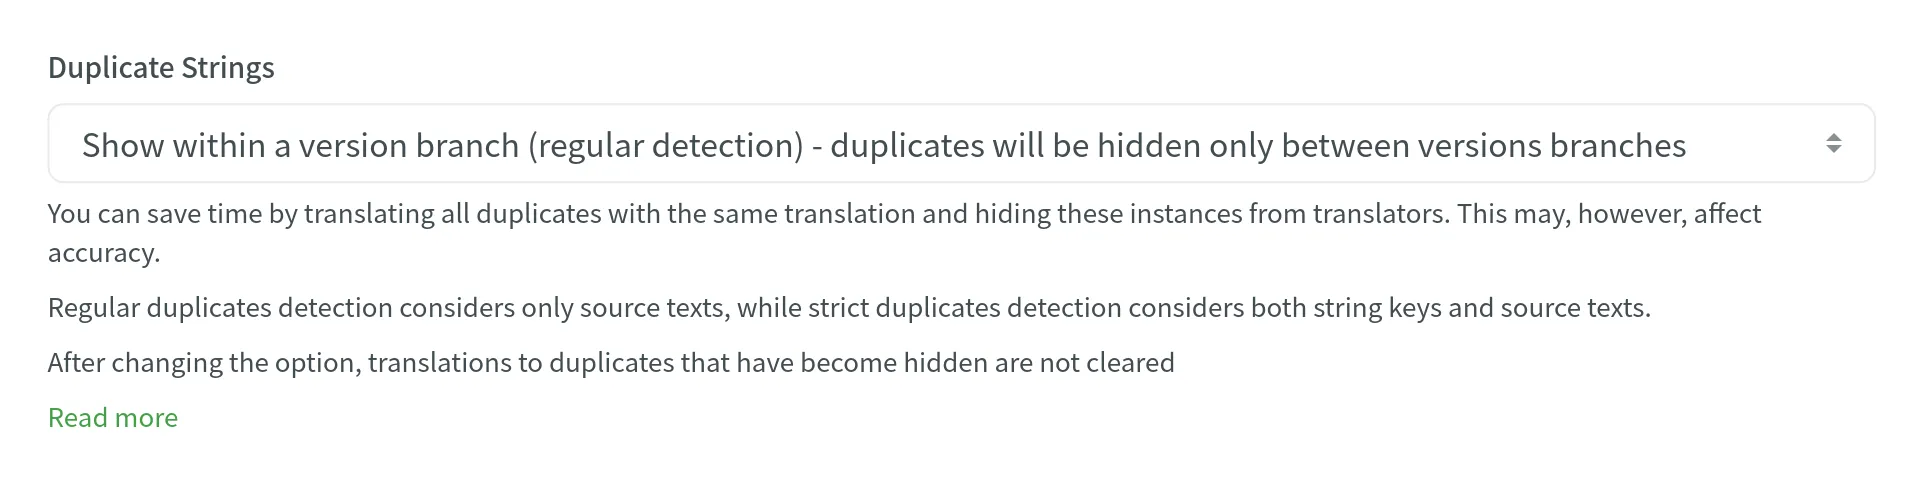
In string-based projects, the Show within a version branch (regular detection) behavior is applied automatically and cannot be changed. This ensures translations are reused between branches without requiring any additional configuration.
Read more about Duplicate Strings.
Geliştiriciler ve çevirmenler arasında sorunsuz bir işbirliği sağlamak için Crowdin’deki sürüm dalları, kaynak içeriği nasıl yönettiğinize ve hangi proje türünü kullandığınıza bağlı olarak farklı şekillerde kullanılabilir.
In both file-based and string-based projects, you can treat your external system (e.g., file storage or version control) as the source of truth. In this setup:
- Kaynak dosyalar Crowdin dışında yönetilir ve güncellenir.
- You upload project content using the web interface (UI), API, CLI, or integrations.
- Seçilen dallar buna göre Crowdin’de oluşturulur.
- Translations are delivered back to your system once completed.
Bu yaklaşımı Crowdin projenize uygulamak için aşağıdaki iş akışını öneririz:
- Proje dosyalarınızı, mevcut yöntemlerden birini kullanarak Crowdin projesine yükleyin.
- In file-based projects, open your project and go to Settings > Import > Source Strings.
- Kopya Dizgiler seçeneğini Bir sürüm dalında göster olarak ayarlayın.
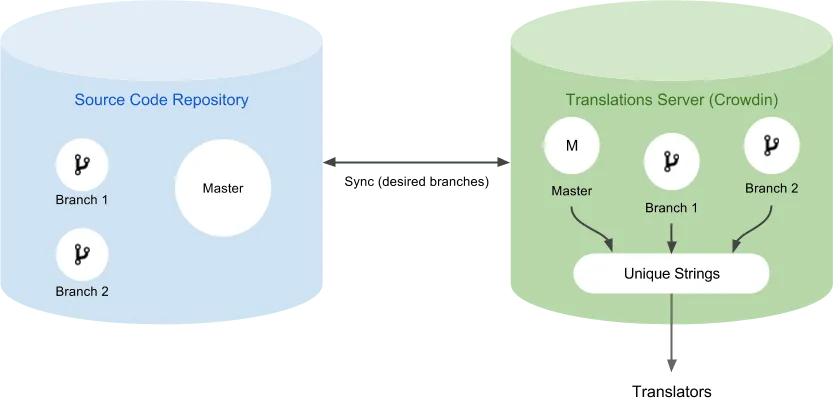
The screenshot below visualizes how this workflow works in practice. All texts from Master, Branch 1, and Branch 2 are transferred to the translation server immediately after they appear, even though the branches are not merged into the Master branch yet.
Crowdin’de İçeriği Yönetme (Sadece Dizgi Tabanlı Projeler)
Bölüm başlığı “Crowdin’de İçeriği Yönetme (Sadece Dizgi Tabanlı Projeler)”Dizgi tabanlı projeler için yapı veya içerik güncellemelerini tanımlamak için harici bir sisteme ihtiyaç duymadan dalları doğrudan Crowdin’de yönetebilirsiniz. In this setup:
- Source content can be added the web interface (UI), API, CLI, or integrations.
- Sürüm dalları, kullanıcı arayüzü veya API kullanılarak Crowdin içinde oluşturulur, çoğaltılır ve birleştirilir.
- Translations are optionally synced back to any connected integration, if used.
Bu yaklaşım, içeriği tamamen Crowdin içerisinde düzenlemeyi ve sürüm akışlarını yönetmeyi tercih eden takımlar için daha fazla esneklik sağlar.
Tüm sürüm dallarından gelen çeviriler, web arayüzü aracılığıyla indirildiklerinde tek bir ZIP arşivine yerleştirilir. Her dal için çevirileri tek tek indirmek amacıyla CLI veya API’yi kullanın.
API ile belirli sürüm dalının çevirilerini indirmek için aşağıdaki API yöntemlerini kullanabilirsiniz:
- Proje Çevirisi Oluşturun -
CrowdinTranslationCreateProjectBuildFormşemasını kullandığınızdan emin olun. - Check Project Build Status.
- Download Project Translations.
Belirli sürüm dalının çevirilerini indirin:
crowdin download -b branch_nameRead more about crowdin download command.
The Master branch will contain new texts from the Feature branches as soon as they are merged. Crowdin ile eşitlenirken, Master dalındaki metinler, uygun daldan gelen çevirilerle doldurulur.
Güncellenen Master dalının Crowdin ile eşitlenmesinden sonra, Feature dalını Crowdin’den kaldırabilirsiniz. All translations stored in the Master branch will remain.
Bu yaklaşım genellikle dosya tabanlı projelerde kullanılır ancak içerik Crowdin dışında yönetiliyorsa dizgi tabanlı projelere de uygulanabilir.
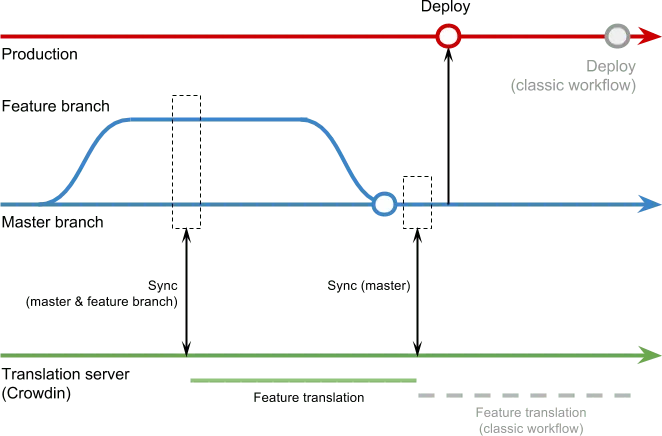
You can verify translations on production using only the Feature branch before changes are merged with your Master branch. Böyle bir deneme dağıtımı, gerekirse orijinal Asıl dal sürümüne hızlı bir şekilde geri dönmenizi sağlar.